

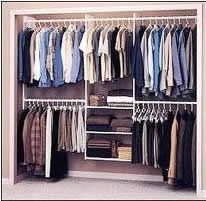
Figure 1 - Plastic coated wire closet organizer
Most home closets start off in a similar manner. They are configured very simply with a closet rod and a shelf above the closet rod, as shown in Figure 2.

Figure 2 - Interior of closet without closet organizer
A closet rod and shelf is the most basic of closet organizers. This style of closet organizer is fine for hanging a few clothes of different lengths but definitely does not take full advantage of the available closet space.
In order to organize any closet it is important to look at the size and number of garments that you would like to be able to hang and as well consider what other types of items, such as folded garments, shoes, hats and accessories that you might want to store in the closet if it was properly configured with a more user friendly
closet organizer.
In a closet that is being used by teenagers and adults it is most likely that you will need space for hanging long items, but it is also likely that there are a lot of shorter items being hung on hangers.
Closets used by younger children, generally will not need space for hanging long items. It should also me noted that the height of a basic closet rod - 78 inches, is not child friendly as youngsters will not be able to reach the clothes that are hanging on it without standing on a stool or chair.
There is no one solution to building closet organizers that will suit every family and there is no one solution to building closet organizers that will suit each member of your family and every closet in your home.
Note: While I usually recommend the use of carpenters glue whenever joining two pieces of wood together, in the case of closet organizers I would suggest that gluing the joints could create a problem in the future. The configuration of a closet organizer will change as children become teenagers and teenagers become adults. It is difficult, if not impossible, to take glue joints apart and considering that you may want to reconfigure the closet organizer at a later date, I suggest that you do not glue the joints. Wood screws and/or wood battens, if placed as suggested will be strong enough to hold the closet organizer together for many years.
Note: I would also recommend that countersunk screw holes are not filled with wood fill or putty compounds and painted or sealed. If you use Phillips or Robertson head screws you can purchase inexpensive plastic caps, as shown in Figure 3, which will neatly cover the screw heads. These plastic caps are easily removable and will allow you to conveniently remove the screws to make adjustments to the configuration of your closet organizer in the future.