

- It is wise to put some wood sealer or exterior paint on the top of the embedded lumber, as this will increase its longevity.
- Once you have the second pedestal support out of the mold it is time to assemble your bench.
- Place the pedestals in an upright position in there final location. In our example the pedestals would be placed 45″ apart (see Figure 6). The pedestals must be square with one another and on the same plane.
To ensure that the pedestals are in fact square and on the same plane, measure the inside of each pedestal corner to opposite corner as shown in Figure 6. If those measurements are identical the positioning is correct.
Figure 6 - Proofing that the concrete base supports are plumb and plane
- Cut the seat and back 2 X 4 lumber to length, in our example that would be eight pieces, each 6 feet long.
- Install the innermost seat member first using two 3″ #10 galvanized or stainless steel flat head wood screws into each of the wood pieces that were embedded into the concrete support pedestals as shown in Figure 7.
- Attach the balance of the seat members, leaving a small gap between each board to allow for water to run off the seat and not pool as shown in Figure 1.
I recommend that you apply your wood sealer, stain or paint to the boards prior to assembly. In that way, the portion of the board that rests against the concrete support pedestal will be sealed. If you do not seal or paint until after assembly the bottom portion of the seat and the back portion of the back boards will have no protection from the weather.
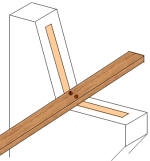
Figure 7 - Installing first seat board for garden bench
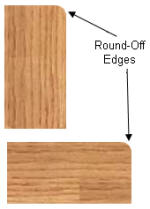
Figure 8 - Rounding edges of seat boards for garden bench
- Attach the back members in the same manner, starting at the lowest and working up. Leave a small gap between boards, the same amount as on the seat boards.
If possible round the upper edge of the outside seat member using a block plane, router or even a rasp and sandpaper as shown Figure 8.
Garden Bench With Wood Pedestal Support:
If building concrete pedestal supports is a more ambitious project than you wish to undertake, the same basic garden bench can be constructed using lumber as shown in Figure 9 and 10.
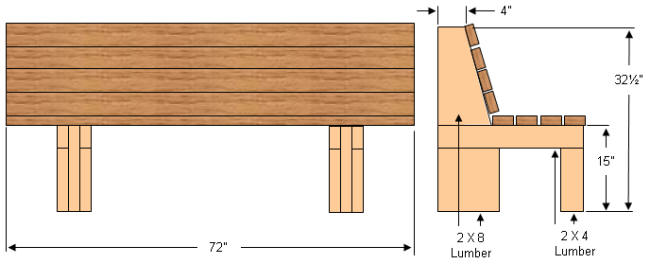
Figure 9 - Diagram of garden bench with wood support frame
The garden bench pedestal support is constructed using 2 X 8 and 2 X 4 lumber. You can use western red cedar, cedar or pressure treated lumber.
All lumber should be painted, stained and sealed before assembly.
For each pedestal you need:
- 2 - 2 X 8, 11 3/8″ long, outside back leg supports
- 1 - 2 X 8, 32 1/2″ long, main back leg
- 2 - 2 X 4, 24 1/2″ long, seat supports
- 1 - 2 X 4, 15″ long, front seat support leg
Construction:
- Start by cutting the lumber to length.
- Cut angle for seat back on main leg.
- Paint, stain and seal all lumber
- Using 3″ #10 galvanized or stainless steel wood screws assemble the pedestal supports.
- Place the pedestal supports in a location where you can ensure that they are plumb and on the same plane. To ensure that they are plumb and on the same plane measure the inside diagonal measurements as shown in Figure 11. The measurements must be the same in both directions.
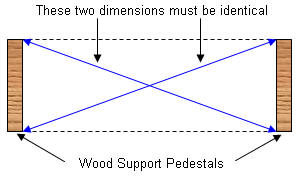
Figure 11 - Proofing that the wood base supports are plumb and plane
- Using 3″ #10 galvanized or stainless steel wood screws attach the inner most 2 X 4 seat board first and work your way outwards allowing a small space between each board to allow for water run-off.
- Using 3″ #10 galvanized or stainless steel wood screws attach the back seat rest boards starting at the lowest board and working your way to the top allowing a small space between each board for water run-off.
- If possible round off the corners of the upper and most outer seat and back boards as shown in Figure 8.
- Touch-up paint, stain and sealer.