Hanging The Gate:
If you are planning on painting or staining the gate, it is best to do it before you hang it.
The gate is meant to have a 2 inch clearance at the bottom in order to meet the gate height that was previously determined.
- Place a scrap 2 x 4 and other material at the base of the gate opening to a height of 2 inches.
- Place the gate on top of the 2 inches of material
- Using shims, packing material or plywood fill the gaps on either side of the gate, between the gate and the posts so that 1/2 inch is separating the gate on both sides, as shown in Figure 16.
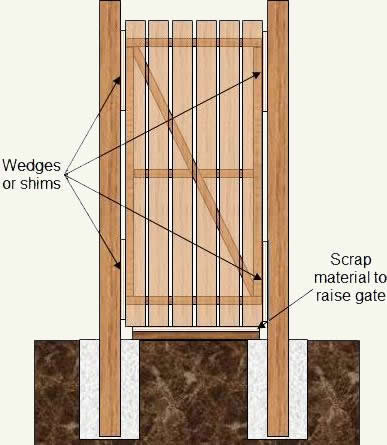
Figure 16 - Gate positioned between posts
- With the gate in position install
T
hinges. For gates less than 3 feet high 2 hinges are adequate. For gates higher than 3 feet, 3 hinges should be installed. Install the hinges on the cross members, as shown in Figure 17, as this will provide added strength. For a gate that opens outwards, the hinges are installed on the finished side of the gate. For gates that open inward, the hinges are mounted on the inside of the gate.
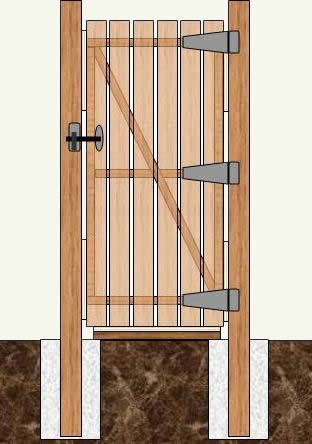
Figure 17 - Installation of gate hinges and latch
Install the gate latch, as shown in Figure 17. It is best to use latches that work from both sides, as shown in Figure 18, rather than the style that requires that a hole be cut in the slats in order to access the gate.

Figure 18 - Gate latch
- Remove the material from in between the gate and the gate posts and the gate should swing freely.
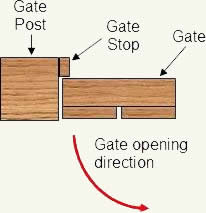
- It is important to install a piece of vertical wood to act as a gate stop, on the latch side gate post, to prevent the gate from attempting to open in the wrong direction.
If the gate post material is wider than the thickness of the gate, the gate stop should be fastened to the inside of the gate post as shown in Figure 19. If the gate post is the same thickness as the width of the gate post, the stop should be fastened to the outside edge of the post as shown in Figure 20.